
Zoom for Dance & Music Classes - Pt. 1 : Using an External Mixer for Audio Streaming
- Cliff 👨🏻💻🤙🏼💥

- Apr 9, 2020
- 8 min read
Updated: Jan 24, 2021

* UPDATE (1.24.2021) : Click HERE for configuring your Zoom to the newest audio settings. *
With most of our county in a stay-in-place order, a lot of dance and music classes has resorted to using Zoom, a video conferencing software, to continue and conduct their classes. However it hasn't been the easiest of transitions. We've sadly heard some have even given up on using Zoom all together.
From music not in sync with the video, degraded audio and video quality, and more, we hope that we can help you continue your classes over the web with a great experience in mind for your viewing audience.
In this Part 1 article, we'll try to explain and help you with the de-sync issues we're hearing many people having a problem with. This is when the webcam video feed does not match to the audio being played by the host presenter. We'll also show you the best method in providing the best quality audio possible on a budget.
Future article posts for Zoom will also cover, 1. Best settings and practices when using just your laptop or mobile device, 2. Tips you didn't know or forgot about internet speeds, and possibly more.
The Causes:
It's hard to pin-point any single cause to this issue, however from personal knowledge and experience, to professional friends in the industry, and even contacting Zoom support, here's probably the top 3 that should concern you the most.
Using the Share Computer Sound feature of Zoom sounds great for your audeince since playing music captured through your computer's microphone is just awful, but unfortunately this is one of the top issues that can cause the de-sync. Zoom processes the video feed and their Share feature separately, and because a video feed has much more data than audio, any hiccup to your internet connection will cause the video to drop frames first while the audio continues to be played in real time.
This brings up the importance of your internet connection. To try to prevent dropped video frames, a stable internet connection with decent upload and download speeds are needed. We recommend to connect via Ethernet cable rather than WiFi if you can, and to run a speed test on your internet connection before every Zoom session. Decent speeds should be at 5-8Mbs download and at least 3Mbs upload or higher. We recommend using Speedtest.net. Note that dropped frames and de-sync can happen even if you have good internet speeds but your viewing aundience does not.
A high end computer would work best, but not necessary. What can cause further hiccups to the stream is unnecessary programs running in the background. Close any programs you're not using, close your browsers or have the least amount of browser tabs open as possible. If you do need to have a browser window open, please do not use YouTube or any video streaming service to run your music. This uses large amounts of data that can affect the speeds needed for the Zoom session.
There are also Zoom settings that will need to be changed to better your chances, but they are specific to your setup. We'll run through the best method that professionals using external equipment use. All audio equipment setup listed here will be under $150.
The Best Solution:
Professionals use external equipment to process and handle the audio. By doing this, you eliminate the two different processing streams that Zoom does when using the Share Computer Audio feature, and essentially taking both your video and audio into a single stream process with the same or even better audio quality. And because the audio is in a single stream process with the video, any dropped frames of the video will also drop the frame of the audio so that you will always appear to be in-sync.
Whether, it's Audio Interfaces, USB Mixers, or even dedicated sound cards, feeding all your audio needs through these devices and into the single input channel that Zoom allows you to have will be your best option. While what we're recommending here might not fit everyone's needs, these recommendations are focused with the dance and music community in mind. If you cannot even afford these budget options, stay tuned as we'll be writing another post for options if you can only use your computer or mobile device.
SETUP 1
(recommended for the quality and features)
Parts List:
Behringer Xenyx Q502USB - USB Mixer
Fifine K037 - Wireless Lavalier Microphone
Total price = ~$130 without batteries
The PROs:
This setup was chosen specifically with the mixer in mind. It has a built-in compressor that prevents any peaking levels to your microphone. Peaking can cause distortion, damage speakers, or even hurt your audiences' ears.
The wireless lavalier mic has a decent distance range from the receiver at ~40ft.
These brands are also of decent quality with high rated reviews and actually used within the game streaming communities.
The CONs:
It's one of the higher priced options, but considering that some of these features can only be found on higher price tags, this budget might be worth while.
You'll need 2 different sized batteries for the wireless lavalier mic. We recommend getting rechargeable batteries as you'll be going through these batteries quiet often.
The diagram below visually explains how to connect everything together, but if you're in need of help, reach out to us on our Facebook group.

SETUP 2
(lowest budget option)
Parts List:
Rockville RockMix 5 - USB Mixer
Pyle PDWM96 - Wireless Lavalier Microphone
Total with cables: ~$75 without batteries
The PROs:
Surprisingly, this budget USB mixer has a decently high rating at such a low cost.
This setup lists the cheapest products found in the new market.
The CONs:
While this wireless lavalier microphone is the cheapest out there, it comes at a cost of quality and poor distance range of about ~10ft. from the receiver. Reviews haven't been the greatest in quality, but when it works, it works.
The diagram below visually explains how to connect everything together, but if you're in need of help, reach out to us on our Facebook group.

SETUP 3
(quality on a budget)
Parts List:
Rockville RockMix 5 - USB Mixer
Fifine K037 - Wireless Lavalier Microphone
Total with cables: ~$98 without batteries
The PROs:
This setup is the same as the previous one but with swapping out the wireless lavalier microphone for better distance range from the receiver.
The CONs:
You'll need 2 different sized batteries for the wireless lavalier mic. We recommend getting rechargeable batteries as you'll be going through these batteries quiet often.
The diagram below visually explains how to connect everything together, but if you're in need of help, reach out to us on our Facebook group.

SETUP 4
(best of class)
Parts List:
Mackie ProFXv3 - USB Mixer
Fifine K037 - Wireless Lavalier Microphone
Total with cables: ~$142 without batteries
The PROs:
This high quality mixer will allow you to mute your voice on your speakers while your voice is still heard by your audience. Listening to your own voice can be distracting for some and even make you speak more soft than normal where your audience will no longer be able to hear you over the music playing.
~40ft. range on the wireless lavalier microphone.
The CONs:
You'll need 2 different sized batteries for the wireless lavalier mic. We recommend getting rechargeable batteries as you'll be going through these batteries quiet often.
This is the highest price tag of all the setups but with good reason.
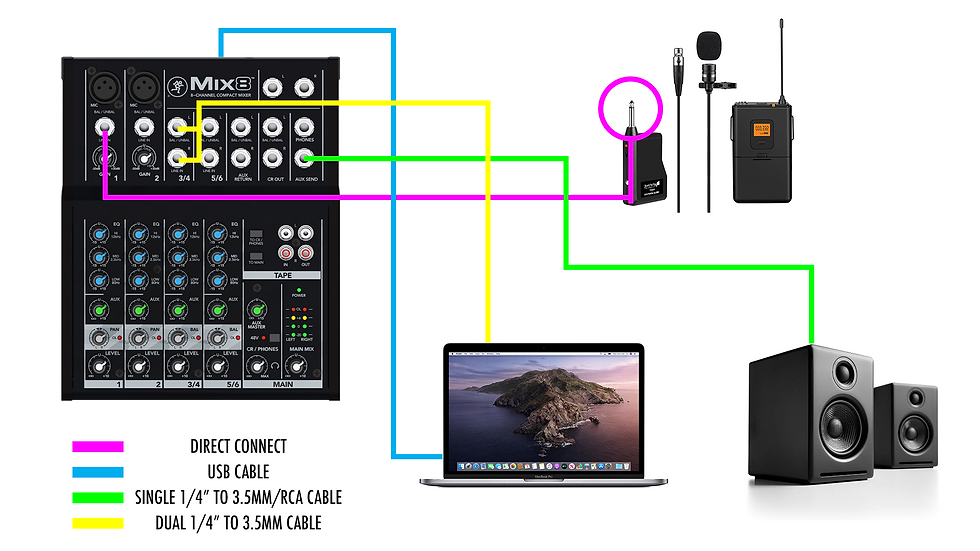
The diagram below visually explains how to connect everything together, but if you're in need of help, reach out to us on our Facebook group.
(Note: Image below does not reflect the updated mixer listed above)
Equipment Settings
There's no one simple answer for this and it will require you to run a few Zoom test sessions to get it just right. But once you do dial in all the settings to your liking, you can set it and forget it! Here are some tips to help you along the way:
Keep in mind that the volume levels you set on your equipment do not translate to the exact volume levels your audience is hearing. Open a Zoom user session rather than listening on your hosting session to test the audio.
Attach the lavalier microphone as close and directional to your mouth as possible. Be aware of your clothing rubbing against the microphone that your viewers will be able to hear.
We recommend a start point by setting the gain/volume on the wireless microphone to half way or a little more than half way to max. Then set the gain on the mixer's microphone channel to 12 o'clock and make all your fine tuning adjustments on the level knob. This is just a starting point and you'll need to make further adjustments depending on your environment.
Set your computer's volume, or the volume of your music player to half or a little more than half, then make further adjustments on the level knob of the mixer.
The mixer has a level meter that lights up from green, to yellow, to red. At any point, stay away from the red and make volume level adjustments accordingly.
The main volume of the mixer pushes all your audio to your speakers. Adjust it to your personal listening taste.
Zoom Settings
Zoom audio settings by default are set with filters and options to be used for speech through a basic microphone like your internal microphone on your laptop. Not really ideal for music playback. Because we'll be using all external equipment to run the audio, we'll have to change some of these settings.
This first settings needs to be accessed in your account through a web browser, not the actual Zoom client software.
Login to your account on Zoom's website and click on Settings off to the left side of the screen.
Under the Meetings tab, click on In Meeting (Advanced).
Find and enable the option Allow users to select original sound in their client settings.
This enables your audience to be able to hear the original sound without any of the default filters or processing. Each audience viewer needs to click Turn on Original Sound that will appear at the top left corner of their video window during the meeting so that no filters or auto processors are active on their end.
Next we'll update some settings within the Zoom client software itself.
Start your Zoom client software and open the Settings.
Click the drop-down menu under Speaker and ensure Same as System or Built-in Output is selected.
This ensures that your computer's audio routes directly to the USB mixer, especially if you're playing music directly from your computer for your audience listening purposes.
Under the Microphone option, click the drop-down menu and select your USB mixer.
Make sure the Input Volume is set to it's max setting.
Uncheck the box Automatically adjust microphone volume.
This will change the audio that your audience is listening to from your internal microphone to all the audio routed to your USB mixer and that the audio stays consistent without any automatic volume adjustments.
Click on the Advanced button on the lower right.
Check the box Show in-meeting option to "Enable Original Sound" from microphone.
This ensures your audience can view the option we enabled earlier within your Zoom account from the web browser.
Under Audio Processing, ensure that Suppress Persistent Background Noise is set to Disabled.
Suppress Intermittent Background Noise is set to Disabled.
And Echo Cancellation is left on Auto.
Because we're routing all audio through the USB mixer and external equipment, we do not need these filters to improve the audio from the built-in computer microphone. In fact, this creates more problems if left enabled. For example, those that hear audio cutting in and out from the stream, it is these background suppressor features that cause the issue. They're great features to have enabled when you're giving a speech with background noise happening, but not ideal for when you want to hear the background, which in our case is music.
Please exercise patience with the process. Remember that this is essentially what professionals do for live streaming and broadcasting. So if this is your first time doing anything like this, it will take a few test runs to get everything dialed in perfectly.
Lastly, some safety tips with your new equipment when powering them on and off.
When powering on, first power on your mixer, mic, and computer. Then power on your speakers.
When powering off, first power off your speakers. Then power off the mixer, mic, and computer.
This will prevent damage to your equipment as well as your and your audiences' ears.
We hope this helps those that need the best quality audio possible for their classes. And if you have questions, comments, or have a different set of needs, come visit our Facebook group and feel free to message us.
* This page contains paid ad links


Comments