Zoom for Dance & Music Classes : Pt. 4 - Using an Apple Computer Only for Clean Audio and No De-Sync
- Cliff 👨🏻💻🤙🏼💥
- Apr 18, 2020
- 4 min read
Updated: Jan 24, 2021

* UPDATE (1.24.2021) : Click HERE for configuring your Zoom to the newest audio settings. *
With much of the dance and music community using MacBook computers, this solution is the most requested from our Facebook Tech Support group. If you're on a Windows computer, please check out my Part 3 Blog, Using a Virtual Audio Mixer for Free.
Before beginning this solution, ensure you read the Part 2 Blog, Optimizing Audio Settings when Using Only a Computer, to understand Zoom's problem when it comes to teaching dance and music classes.
Let's get started if you're on a MacBook or Apple computer ..
Step 1: Download Software
There are two different software that you must download and install for this solution. Ensure that you do both steps below.
Step 2: Configure Audio Midi Setup
We need to change some of the default audio settings native to your computer. This is done through Audio Midi Setup where we will be re-configuring your audio settings to use the iShowU Audio Capture software.
From a Finder window, go to Applications > Utilities > and open Audio Midi Setup.
Click the + icon at the bottom left of the window and select Create a Multi-Output Device.
Check the boxes under Use for Built-in Output & iShowU Audio Capture. NOTE: If you use a Bluetooth speaker, check the box for your Bluetooth speaker.
Check the box Drift Correction for the Built-in Output. iShowU Audio Capture's Drift Correction should be left un-checked. NOTE: Check the Drift Correction box if your using a Bluetooth speaker.
Drop-down the menu for Master Device and select iShowU Audio Capture.
Right-click Multi-Output Device and select Use This Device For Sound Output. NOTE: You should then see a speaker icon on the Multi-Output Device selection.

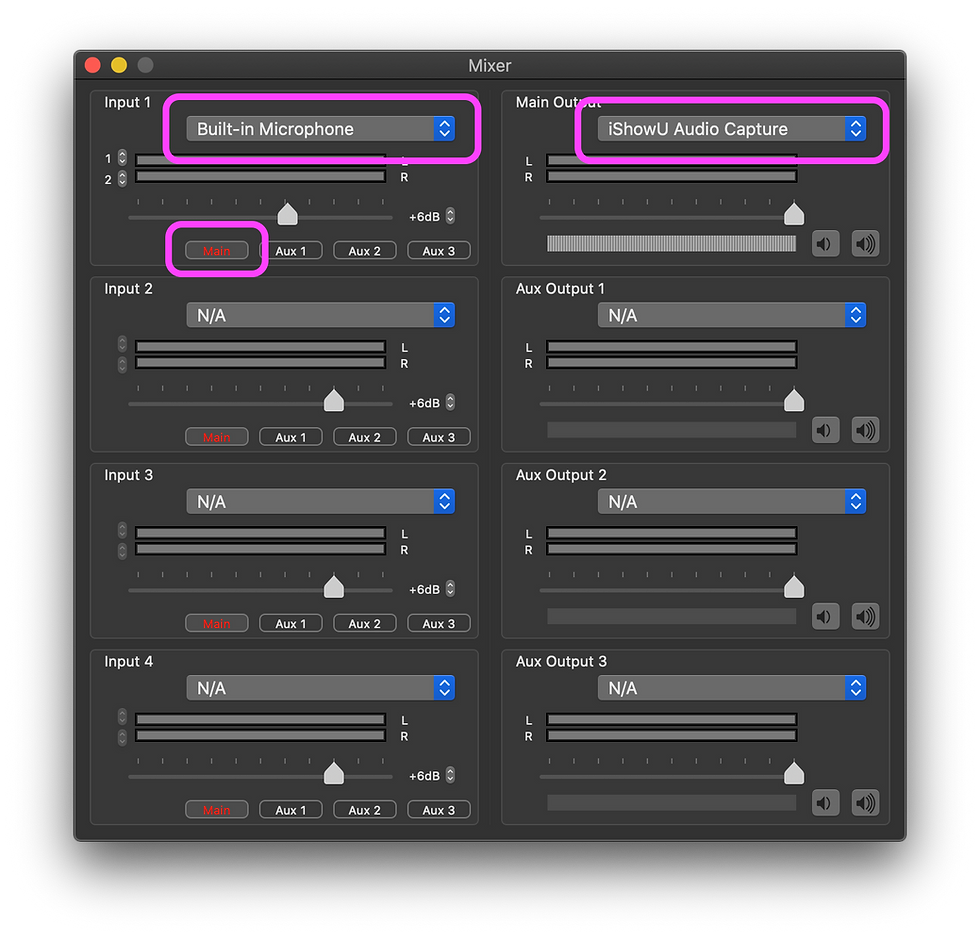
Step 3: Configure LadioCast
LadioCast is used to send your internal microphone to your computer's output so that the iShowU Audio Capture software can capture all sounds and music being played on your computer, including your internal microphone.
Select Built-in Microphone under Input 1 if it not already selected. NOTE: If you're using Airpods or a Bluetooth headset, select it under Input 1 instead.
Click the Main button under Input 1 if it is not active already by default.
Drop down the menu for Main Output and select iShowU Audio Capture.
Note that it is here, under Input 1 for the micriphone, that you want to use the volume slider to adjust your microphone's volume. Do not use Zoom's microphone volume slider.

Step 4: Configure Zoom
Last we just have to change Zoom's audio settings to use this new configuration.
Open Zoom and Zoom's Settings.
Click on Audio on the left of the Settings window.
Select iShowU Audio Capture under Microphone.
Uncheck the box Automatically adjust microphone volume.
Click the Advanced button on the lower right.
Select Disable for both the Suppress Persistent & Intermittent Background Noise.


Setting up your computer before your Zoom class in not as complex as the steps above. In fact, there's only three steps to do.
Audio Setup Before Class
Open Audio Midi Setup and right-click Multi Output Device > select Use This Device For Sound Output. NOTE: Make sure the speaker icon is on the selected Multi Output Device.
Open LadioCast and leave it as is. The previous settings we configured should have been saved. NOTE: LadioCast must stay open for the entire Zoom session.
Open Zoom and go to Settings > Audio > and change the Microphone setting to iShowU Audio Capture.


Just as easy it was to setup your audio for your Zoom class, it is just as easy to go back to your computer's default audio settings.
Back to Default Audio Settings After Class
On Zoom, open Settings > Audio > and change the Microphone setting back to Built-in Microphone.
Close LadioCast.
On Audio Midi Setup, right-click Built-in Output > select Use This Device For Sound Output.


Some Additional Tips when Conducting Class
Run tests from a student's perspective to balance the music volume and microphone volume. I achieve this by creating two Zoom accounts and use my mobile phone to run the test. Make sure you are well far away from your computer as you will get strong echo and audio feedback. I find myself having to go to another room even.
Spotify, YouTube, iTunes/Music, Soundcloud, and any other music players volume sliders are your new best friend. Using this solution will disable your default volume controls on your computer and you will not be able to use them again until you go back to your computer's default audio settings. Therefore when conducting your class, use only the volume sliders directly on Spotify, iTunes/Music, or which ever music player software you're using. *See photo below for example.
Lowering the volume on your external speakers will only lower the volume for yourself and not your students. Therefore ensure to use only the above #2 volume sliders to control or mute/pause your music.
Do not use the microphone mute button on Zoom. This will actually mute all sound going to Zoom, which is your music and microphone.
The internal microphone will still pickup the sound of your music in the background. It's best to connect external speakers and place the speakers as far as you can from your computer as you may get audio feedback if you do not.

While this solution was one of the hardest to research and test, it's actually much easier to set up this configuration than the Windows PC counterpart.
I hope this article helps out much of the dance and music educational community. If you need further help or want to stay updated with more tutorials and tips, join our Facebook group, Live Streaming Online Dance & Music Class Tech Support Group.


Comments